
Note: I’m based in Korea, so some context here is Korea-specific.
Hardware
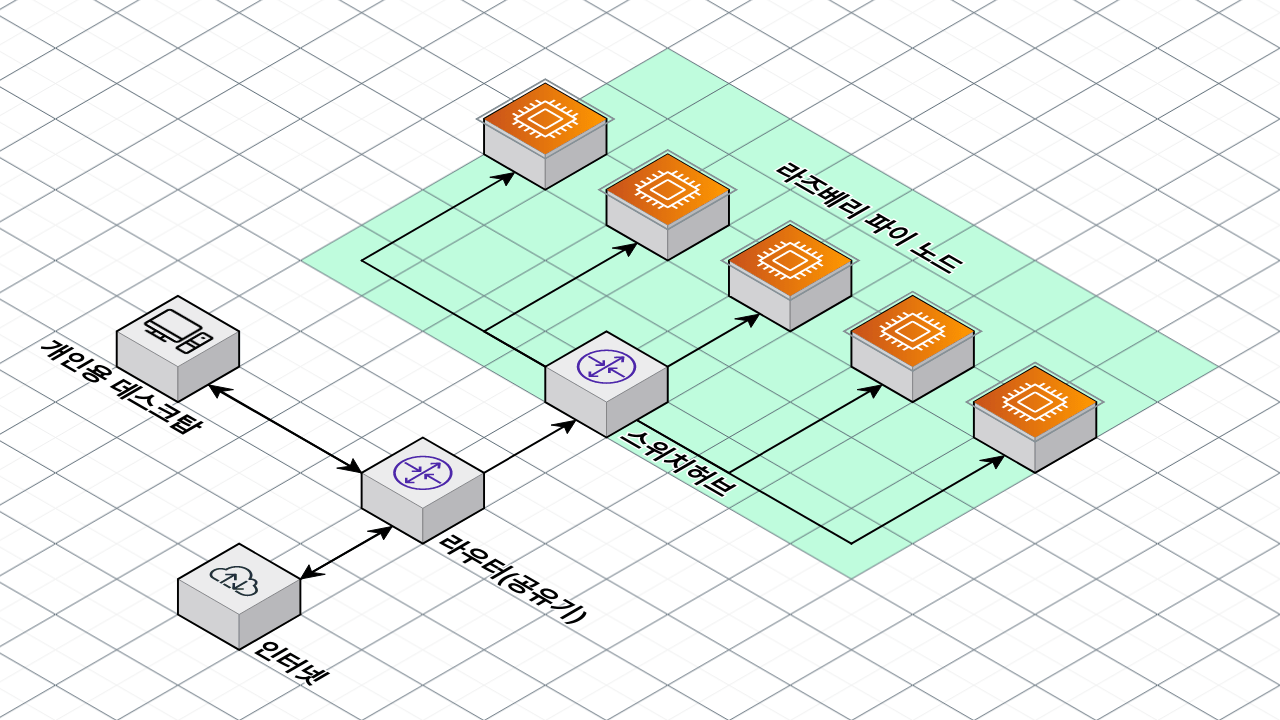
Set up your hardware as shown in the diagram above.
If you already use a computer at home, you most likely already have a router and a desktop set up, so you only need to add the parts marked in green.
If you bought an unmanaged switch hub online, just plug all of the Raspberry Pi LAN cables into the switch hub, then run a single internet cable from your router to the switch.
Raspberry Pi Setup
Following my previous posts, Raspberry Pi initial setup that I’m posting for myself and Raspberry Pi USB Boot setup that I wrote after burning out three SD cards , or other blogs, install Ubuntu Server 22.04 on each Raspberry Pi.
You can build the cluster on SD cards, but I strongly recommend setting up USB Boot and booting from USB instead.
From here on, I’ll assume Ubuntu is installed on the Raspberry Pi and SSH connections work.
Then run sudo apt update -y && sudo apt upgrade -y && sudo apt install linux-modules-extra-raspi to install the required dependencies. (See Installing K3S on Raspberry Pi + Ubuntu 22.04
)
DHCP Server Setup
After powering on each Pi for the first time, the Pi will be assigned an internal IP. (If you haven’t changed any settings, it will be in the form 192.168.0.X.)
Unless you configure something else, this internal address will be picked from whatever IPs are free every time the Pi boots, so the IP can change. That means you’d have to look up each node’s IP from the router admin page every time, which is a hassle.
(To be precise, it might or might not change. Most of the time it stays the same, but I set this up just in case.)

Find a menu similar to the DHCP server settings shown above (this is for ipTIME1), enter the MAC address of each Pi (1A-2B-3C…), and assign each one a fixed IP.
For convenience, I used 192.168.0.20 for the Control Node and 192.168.0.21–30 for Worker Nodes, but you can pick whatever IPs you like.
After this, Windows users can use Putty, while Linux/Mac users can use the ssh CLI to prepare for connecting.
Sign up for Supabase and get Postgres access
Allocating three machines as Control Nodes feels wasteful, but allocating just one makes recovery hard if the Control Node dies. As a compromise:
We’ll keep the cluster state in an external SaaS, so that even if the Control Node dies, we can replace it and pull the state back from external storage.
For this, we’ll use Supabase, which provides a free DB.
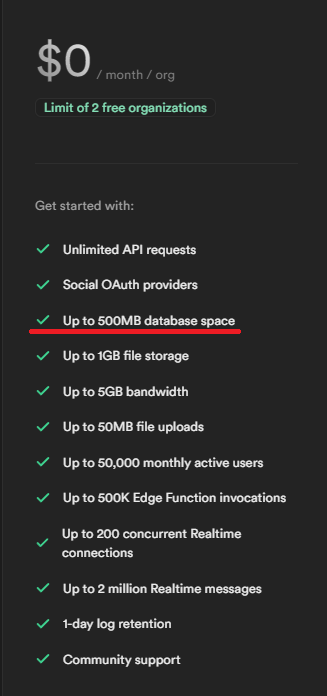
Sign up at Supabase , then set up and grab the Postgres connection credentials.
If you can, configure PgBouncer too — Supabase supports it.
(Because of connection limits, once you install Portainer later it works fine, but you’ll see a lot of error messages without PgBouncer.)
Setting up the Master Node
I’m assuming Ubuntu has already been installed following the steps above.
Prepare the following:
- The IP of the Raspberry Pi you’ll use as the Master Node (the IP you set in the DHCP server settings above)
- Example:
192.168.0.20. You’ll need this when joining Worker Nodes later, so write it down.
- Example:
- A random token for the Kubernetes cluster nodes to join with. I used a 60-character random string of upper/lowercase letters and digits, no special characters. You’ll need this when joining Worker Nodes later, so write it down.
- Example:
jUofPu4hMegXLDKgCn6FbsfWcL8mFQu3DYEiyDjQgh8447cMAqwfgYwTeNU4
- Example:
- The Postgres endpoint you prepared above.
- Example:
postgres://postgres:postgresPassword@db.mydb.supabase.co:5432/postgres
- Example:
curl -sfL https://get.k3s.io | sh -s - --write-kubeconfig-mode 644 --disable servicelb --token <2,myToken> --node-taint CriticalAddonsOnly=true:NoExecute --bind-address <1,myControlNodeIP> --disable local-storage --datastore-endpoint <3, postGresEndpoint>Fill in 1, 2, and 3. Here’s an example:
curl -sfL https://get.k3s.io | sh -s - --write-kubeconfig-mode 644 --disable servicelb --token mytoken --node-taint CriticalAddonsOnly=true:NoExecute --bind-address 192.168.0.20 --disable local-storage --datastore-endpoint postgres://postgres:postgresPassword@db.mydb.supabase.co:5432/postgresGoing through each option:
curl -sfL https://get.k3s.io | sh -s -: Sets up K3S.--write-kubeconfig-mode 644: Sets the KubeConfig file permissions to 644. We’ll need this for later configuration.--disable servicelb: Disables K3S’s default Service Load Balancer (klipper-lb). We’ll install MetalLB as a separate load balancer later.--token <mytoken>: Sets the token used by K3S cluster nodes to join.--node-taint CriticalAddonsOnly=true:NoExecute: Adds a taint to the Control Node. In other words, for stability, only critical containers run on the Control Node, nothing else. If you only have one node, or you want to run containers on the Control Node anyway, remove this option.--bind-address <myControlNodeIP>: Binds the master node to a specific IP.--disable local-storage: Disables K3S’s default Local Storage. We’ll install Longhorn Storage separately later.--datastore-endpoint <postGresEndpoint>: Uses an external database as the state store instead of the embedded Etcd.
Run this command on the Master Node and Kubernetes will start installing.
Next, edit the hosts file for convenience.
Run sudo vi /etc/hosts (any text editor works) and add lines like the following.
192.168.0.20 control01 control01.local

192.168.0.21 worker01 worker01.local
192.168.0.22 worker02 worker02.local
192.168.0.23 worker03 worker03.local
In my case, I used the nicknames control01 for 192.168.0.20, worker01 for .21, worker02 for .22, and so on.
With this set up, you can later SSH into nodes from the control node simply with ssh worker01.
Finally, set up SSH so the Master Node can easily reach the Worker Nodes.
Run ssh-keygen and just hit Enter through everything to generate an SSH key.
Then copy the contents of ~/.ssh/id_rsa.pub somewhere safe.
Setting up Worker Nodes
I’m assuming Ubuntu has already been installed following the steps above.
First, set up SSH access.
In ~/.ssh/authorized_keys, add a newline and paste in the contents of the id_rsa.pub you just copied.
Then from the control node, run something like ssh worker01 to verify the connection works.
If it doesn’t, search for “ssh authorized_keys setup” and troubleshoot from there.
Next, install K3S.
Prepare the following:
- The IP of the Master Node from above
- The Master Node token from above
Run this command to join the Worker Node:
curl -sfL https://get.k3s.io | K3S_URL=https://<1,myControlNodeIP>:6443 K3S_TOKEN=<2,myToken> sh -Fill in 1 and 2 like so. Here’s an example:
curl -sfL https://get.k3s.io | K3S_URL=https://192.168.0.20:6443 K3S_TOKEN=mytoken sh -Then verify the node joined.
Verifying Node Join and Creating Labels
From the Control Node, run kubectl get nodes and confirm the nodes joined successfully.
Then to fix the ROLES column, run the following commands from the Control Node for each node.
If you have fewer nodes, run fewer; if you have more, run more.
kubectl label nodes worker01 kubernetes.io/role=worker
kubectl label nodes worker02 kubernetes.io/role=worker
kubectl label nodes worker03 kubernetes.io/role=worker
Next, add labels so that when you create containers, they only land on specific Pods (Worker Nodes). (You need both the labels above and the ones below!)
kubectl label nodes worker01 node-type=worker
kubectl label nodes worker02 node-type=worker
kubectl label nodes worker03 node-type=worker
Now do a final check.
Here’s what mine looks like — your ROLES column may still differ. (kubectl get nodes)
NAME           STATUS   ROLES                  AGE    VERSION
control01      Ready    control-plane,master   307d   v1.27.4+k3s1
worker02       Ready    worker                 307d   v1.27.4+k3s1
worker01       Ready    worker                 307d   v1.27.4+k3s1
worker03       Ready    worker                 307d   v1.27.4+k3s1
Also check the labels you added (kubectl get nodes --show-labels).
There will be a bunch of labels — you only need to confirm that the node-type=worker you added is there.
Wrapping Up
Congrats! You’ve successfully finished the hardware and Kubernetes installation.
It’s a long process, so if you get stuck anywhere, feel free to drop a comment!
ipTIME is a popular consumer router brand in Korea, so its admin UI is what most Korean home users are familiar with. The same DHCP reservation idea applies to any router. ↩︎
Comments