Note: I’m based in Korea, so some context here is Korea-specific.
What if we could manage our entire system through Git? Wouldn’t it be incredibly convenient if we declared everything we need - container types, counts, etc. - in Git, and the cluster ran exactly as declared?
We wouldn’t have to check various parts of the cluster - we could just look at the configuration values pushed to Git.
Also, if a problem occurred during deployment, couldn’t we just revert immediately? And the issues that come from multiple people managing the same cluster could be handled through PRs, just like we always do.
Finally, if the cluster suddenly had a problem and all nodes went down, since the declared state is in Git, we could quickly recover even through a different cluster.
This approach is called GitOps, and ArgoCD is a tool that helps keep the state declared in Git in sync with the cluster’s actual state.
There’s really, really a lot of systems we’ll need to deploy from now on, so let’s first install ArgoCD to help with this GitOps workflow.
Let’s also configure Traefik’s Let’s Encrypt setup so that ArgoCD can be accessed externally.
Applying Traefik Let’s Encrypt Certification
- Reference article: HTTPS on Kubernetes Using Traefik Proxy
On the Control Node, create a traefik-update.yaml file referencing the following.
# https://traefik.io/blog/https-on-kubernetes-using-traefik-proxy/
apiVersion: helm.cattle.io/v1
kind: HelmChartConfig
metadata:
  name: traefik
  namespace: kube-system
spec:
  valuesContent: |-
    ports:
      web:
        redirectTo:
          port: websecure
          priority: 10
    additionalArguments:
      - "--log.level=INFO"
      - "--certificatesresolvers.le.acme.email=yourMail@gmail.com"
      - "--certificatesresolvers.le.acme.storage=/data/acme.json"
      - "--certificatesresolvers.le.acme.tlschallenge=true"
      - "--certificatesresolvers.le.acme.caServer=https://acme-v02.api.letsencrypt.org/directory"
Then apply it to the cluster using kubectl apply -f traefik-update.yaml.
After this, you’ll be able to use le (Let’s Encrypt) as the CertificationResolver in IngressRoute. (If this doesn’t make sense yet, you’ll understand as we go through the steps.)
Installing ArgoCD
Let’s install ArgoCD and link it with GitHub SSO.
Set up DNS. Connect the subdomain you’ll use to access ArgoCD externally with your current IP address.
- Visit a “What’s my IP” service to check your IP.
- Go to where you purchased your DNS and add an A record with the IP4 Address set to the IP you just checked.
Create a
Github Organizationand create an appropriate Role. In my case, I added an “Admin” Role to my personal Organization.Go to Organization -> Settings -> Developer Settings -> OAuth Apps and add a new OAuth app.
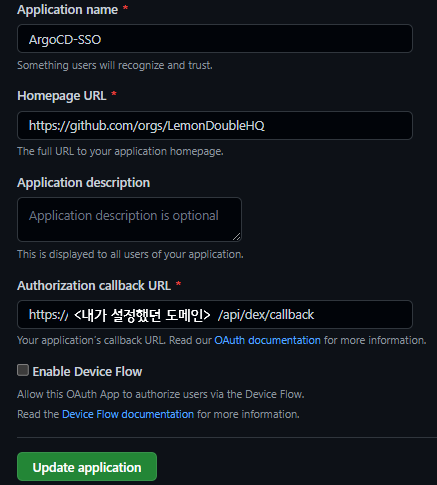
Set the Authorization callback URL to https://<the domain you just configured>/api/dex/callback.
You can change the rest as you like.
After that, generate and remember the Client ID, Secret.
- Create a values.yaml file
Write a values.yaml file referencing the following.
configs:
  params:
    # Run in insecure mode since Traefik handles HTTPS
    server.insecure: true
  rbac:
    # Built-in Policy : https://github.com/argoproj/argo-cd/blob/master/assets/builtin-policy.csv
    policy.default: role:readonly
    policy.csv: |
      g, <Github Organization name>:<Role name you created>, role:admin

server:
  config:
    url: https://<configured domain name>

    dex.config: |
      connectors:
      - type: github
        id: github
        name: github
        config:
          clientID: <Client ID you just received>
          clientSecret: <Client Secret you just received>
          orgs:
          - name: <Github Organization name>
For example:
configs:
  params:
    # Run in insecure mode since Traefik handles HTTPS
    server.insecure: true
  rbac:
    # Built-in Policy : https://github.com/argoproj/argo-cd/blob/master/assets/builtin-policy.csv
    policy.default: role:readonly
    policy.csv: |
      g, LemonLemon:Admin, role:admin

server:
  config:
    url: https://argo.lemon.com

    dex.config: |
      connectors:
      - type: github
        id: github
        name: github
        config:
          clientID: vadf45a6sdfad
          clientSecret: adsfvasd45f6ads4f56asd7
          orgs:
- name: LemonLemon- Create the ingress.yaml file
apiVersion: traefik.containo.us/v1alpha1
kind: IngressRoute
metadata:
  name: argocd-ingress
  namespace: argocd
spec:
  entryPoints:
    - websecure
  routes:
    - kind: Rule
      match: Host(`<configured domain name>`)
      priority: 10
      services:
        - name: argo-cd-argocd-server
          port: 80
    - kind: Rule
      match: Host(`<configured domain name>`) && Headers(`Content-Type`, `application/grpc`)
      priority: 11
      services:
        - name: argo-cd-argocd-server
          port: 80
          scheme: h2c
  tls:
    certResolver: le
Here’s an example.
apiVersion: traefik.containo.us/v1alpha1
kind: IngressRoute
metadata:
  name: argocd-ingress
  namespace: argocd
spec:
  entryPoints:
    - websecure
  routes:
    - kind: Rule
      match: Host(`argo.lemon.com`)
      priority: 10
      services:
        - name: argo-cd-argocd-server
          port: 80
    - kind: Rule
      match: Host(`argo.lemon.com`) && Headers(`Content-Type`, `application/grpc`)
      priority: 11
      services:
        - name: argo-cd-argocd-server
          port: 80
          scheme: h2c
  tls:
certResolver: le- Once you’ve written
values.yamlandingress.yaml, install argocd with the following commands.
kubectl create namespace argocd
helm repo add argo https://argoproj.github.io/argo-helm
helm install -n argocd argo-cd argo/argo-cd -f values.yaml

kubectl apply -f ingress.yaml
After waiting a moment, when you access the configured domain (in my case https://argo.lemon.com), ArgoCD will greet you properly.
After that, click the Log in Via Github button to log in.
If login succeeds, the installation is complete!
※ Tip: If you get a 401 error, try killing the argocd-server pod in the argocd namespace.
Connecting ArgoCD to a Git Private Repo
If you’re using a Public Repo for your cluster, you can skip this step, but to prevent any potential mishaps, let’s use a private Repo on Git and connect it from ArgoCD as well.
After adding a new (empty) repository on GitHub, let’s link that repository with ArgoCD.
- After logging into ArgoCD, click Settings -> Repository -> Connect Repo.
- Connection method via SSH, Name can be anything, Project is default, Repository URL is the
ssh addressfor git clone, and SSH private key data is the~/.ssh/id_rsafrom the Control01 node, copied and pasted in. - Connect Git.

Wrapping Up
Today we covered Traefik Ingress configuration, ArgoCD installation, and Git integration.
In the next post, we’ll clean up the (somewhat scattered) yaml files we’ve made so far, organize the repository structure using App of Apps, and build a system that can recover with a single click even if a failure occurs.
As always, please let me know if there’s anything wrong!
Comments