Note: I’m based in Korea, so some context here is Korea-specific.
The content below overlaps significantly with Section 3 of the Sealed Secrets post. If you’ve already gone through that section and are familiar with Basic Auth, feel free to skip.
1. Introduction
When working with Kubernetes, you end up running quite a few services.
Of course, keeping things on the internal network only is the most secure option, but you might not always be able to manage your cluster from inside that network. For example, something could go wrong while you’re traveling.
In such cases, there are roughly two ways to handle it.
- Use a VPN to connect to the internal network from another computer and use the related services
- Expose the service to the internet but add an authentication mechanism
I personally went with option 2 and built my own SSO server.
However, since setting up an SSO system is a fairly involved process, I want to start with the simplest authentication mechanism first.
2. The Flow of Basic Auth
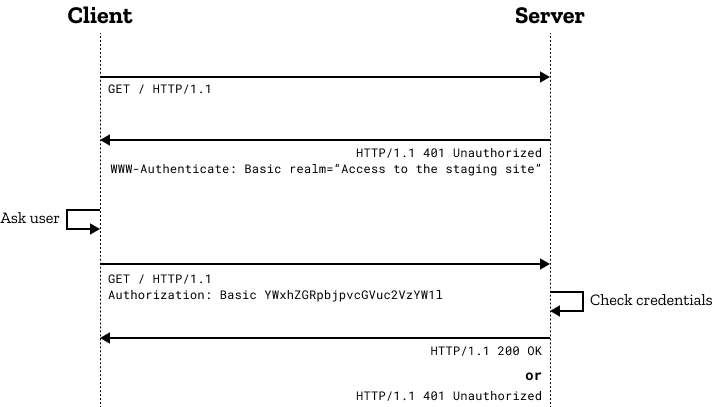
Basic Auth is super simple!
- The client requests a page from the server.
- The server receives the request, and if there’s no authentication info, it responds with 401 and asks for an authentication method (Basic Auth).
- The client receives the response and proceeds with Basic Auth.
- At this point, it sends
Basic ${auth token}in the HTTP Authorization header. - The auth token is Base64Encode(“userId:password”).
- For example, if the id is lemondouble and the password is 1q2w3e4r!, you base64 encode
"lemondouble:1q2w3e4r!"to getbGVtb25kb3VibGU6MXEydzNlNHIh.
- At this point, it sends
- The server verifies this token and returns a normal response.
3. Pros and Cons of Basic Auth
Pros:
- Built-in! Most browsers support it without any extra setup.
- Simple to implement. Most web frameworks support it out of the box!
Cons:
- Weak security. This is the biggest downside.
- The password is sent on every request, base64 encoded (= effectively plaintext).
- It’s fine if you use HTTPS, but with HTTP, the password is transmitted in plaintext on every request!
- It doesn’t defend against brute-force attacks.
- This is more of an Id/Password issue, but with Traefik’s default settings, there’s no feature like dropping clients that have failed too many requests.
- If your Id/Password is weak, a malicious attacker could gain access to the service via brute force.
- The password is sent on every request, base64 encoded (= effectively plaintext).
Therefore, if possible, I recommend using this feature for:
- Services where access isn’t a big deal, or services you only want to share with a few users
- Over the HTTPS protocol
- With a sufficiently long password
4. How to Configure Basic Auth
- We’ll use Sealed Secrets to encrypt access info (Id/Password) and store it in Git.
- The reasons are:
- To recover the cluster quickly along with access info in case of an unexpected accident (since Secret info is also in Git, you just deploy)
- To prevent accidental Id/Password exposure due to a momentary mistake, even when using a Private Repo
Disclaimer: The content below is identical to Section 3 of the Sealed Secrets post!
Let’s learn how to configure Basic Auth by setting up the Longhorn Dashboard to be accessible from outside.
- Run
apt install apache2-utilsso you can use the htpasswd command. - Use
htpasswd -nb <id> <password> | openssl base64to get a Secret String containing the id and password. - Create secret.yaml with any text editor, and add a Secret based on the following:
apiVersion: v1
kind: Secret
metadata:
  name: longhorn-system-basic-auth
  namespace: longhorn-system
data:
users: <String obtained in step 2>- Run
cat secret.yaml | kubeseal --controller-namespace=sealed-secrets-system --controller-name=sealed-secrets -oyaml > sealed-secrets.yamlto get sealed-secrets.yaml. - Register the ingress as follows:
modules/longhorn-system/ingress.yaml
apiVersion: traefik.containo.us/v1alpha1
kind: IngressRoute
metadata:
  name: longhorn-dashboard
  namespace: longhorn-system
spec:
  tls:
    certResolver: le
  routes:
    - kind: Rule
      match: Host(`<your desired subdomain, e.g. longhorn.lemon.com>`)
      middlewares:
        - name: basic-auth
          namespace: longhorn-system
      services:
        - name: longhorn-frontend
          port: 80
---
apiVersion: traefik.containo.us/v1alpha1
kind: Middleware
metadata:
  name: basic-auth
  namespace: longhorn-system
spec:
  basicAuth:
    secret: longhorn-system-basic-auth
In modules/longhorn-system/sealed-basic-auth-secret.yaml, paste the sealed-secrets.yaml you just generated.
apiVersion: bitnami.com/v1alpha1
kind: SealedSecret
metadata:
  creationTimestamp: null
  name: longhorn-system-basic-auth
  namespace: longhorn-system
spec:
  encryptedData:
    users: adfasdflavasdlfj...
  template:
    metadata:
      creationTimestamp: null
      name: longhorn-system-basic-auth
namespace: longhorn-system- Then deploy.
- After that, when you access the page, an id/password prompt will appear, and you won’t be able to see the page without logging in!
5. Wrapping Up
Basic Auth was my initial cluster management approach.
If you don’t have many services exposed externally, I felt that just configuring Basic Auth and managing credentials with a password manager like Bitwarden was good enough.
But what if you end up with more projects later?
I’ll cover an SSO authentication method in the next post to address that scenario.
That said, since the auth server is DIY-built, it’ll be hard to provide the full source code. Please bear with me as I cover the more readily usable Basic Auth first.
Comments