
Note: I’m based in Korea, so some context here is Korea-specific.
Installing Helm
- Reference: Installing Helm
Run the following commands in order to install Helm.
curl -fsSL -o get_helm.sh https://raw.githubusercontent.com/helm/helm/main/scripts/get-helm-3
chmod 700 get_helm.sh
./get_helm.sh
Next, configure the kubeconfig file.
cp /etc/rancher/k3s/k3s.yaml ~/.kube/config
chmod 600 ~/.kube/config
Then add the following line to the bottom of your bashrc, and run source ~/.bashrc to apply the shell settings immediately.
export KUBECONFIG=~/.kube/configHelm plays a role similar to a package manager for Kubernetes.
For example, let’s say I want to install Kafka in cluster mode.
If I had to bring up Kafka on Kubernetes manually, I’d have to pull the Kafka container image, enable cluster options, set up internal networking, and so on.
Now imagine upgrading the Kafka version.
I’d have to bump the container image version in the Kafka cluster YAML file I wrote, check compatibility if I happened to use other resources during the cluster install… and other complex tasks would await me.
But what if someone had already done all of this work in advance?
That’s called a Helm Chart, and we can just type helm install kafka to get a Kafka cluster with networking and cluster settings already configured.
But if everyone used the same Helm Chart, people like us(?) who just want to spin up a single Kafka container for experiments and large companies that need hundreds of Kafka instances forming a cluster would be stuck using the same configuration.
To handle these cases, Helm and Charts provide an additional configuration file called Values.yaml.
In other words, if I only need one container, I can read the chart’s values.yaml carefully and set something like kafka.container-count : 1 to inject that variable, allowing me to use the Helm Chart flexibly with the configuration I need. (Just like server environment variables!)
Installing MetalLB
- Reference: Installation With Helm
Now let’s use Helm to install the load balancer, MetalLB!
Enter the following commands in order. Unless otherwise noted, all commands are run on the Control Node.
helm repo add metallb https://metallb.github.io/metallb
helm upgrade --install metallb metallb/metallb --create-namespace --namespace metallb-system --wait
Then create a file called ip-address-pool.yaml, write the following, and apply it with kubectl apply -f ip-address-pool.yaml.
The following means that we’ll assign IPs between 192.168.0.200 and 192.168.0.250 to services that need an IP, like load balancers.
apiVersion: metallb.io/v1beta1
kind: IPAddressPool
metadata:
  name: ipaddresspool
  namespace: metallb-system
spec:
  addresses:
    - 192.168.0.200-192.168.0.250
---
apiVersion: metallb.io/v1beta1

kind: L2Advertisement
metadata:
  name: default
  namespace: metallb-system
spec:
  ipAddressPools:
  - ipaddresspool
Now, if everything is set up correctly, services using LoadBalancer will be assigned an IP.
Run kubectl get svc -n kube-system and check whether the EXTERNAL-IP field of traefik has been assigned 192.168.0.xxx.
If you didn’t configure anything separately, it was probably assigned 192.168.0.200.
Configuring Router Port Forwarding
Once you’ve checked Traefik’s IP, let’s get one thing (that we’ll need next time) out of the way in advance.
Find your router’s port forwarding settings, and forward ports 80 and 443 to the Traefik IP you just confirmed.

How Does MetalLB Work?
MetalLB can operate in either ARP mode or BGP mode, but since we’re using ARP mode, let’s take a very brief(?) look at how ARP mode works.
Before looking at the images, you’ll need a bit of background knowledge.
- A MAC address is hardwired into hardware, exists from factory shipment, and is unique.
- A router’s port forwarding takes external requests on a specific port and translates them to a specific IP on the internal network.
- For example, if you set ports 80 and 443 to forward to 192.168.0.200 as we did above, http (port 80) and https (port 443) will be routed to the node with 192.168.0.200 on the internal network.
The subsequent network request flow is as follows.
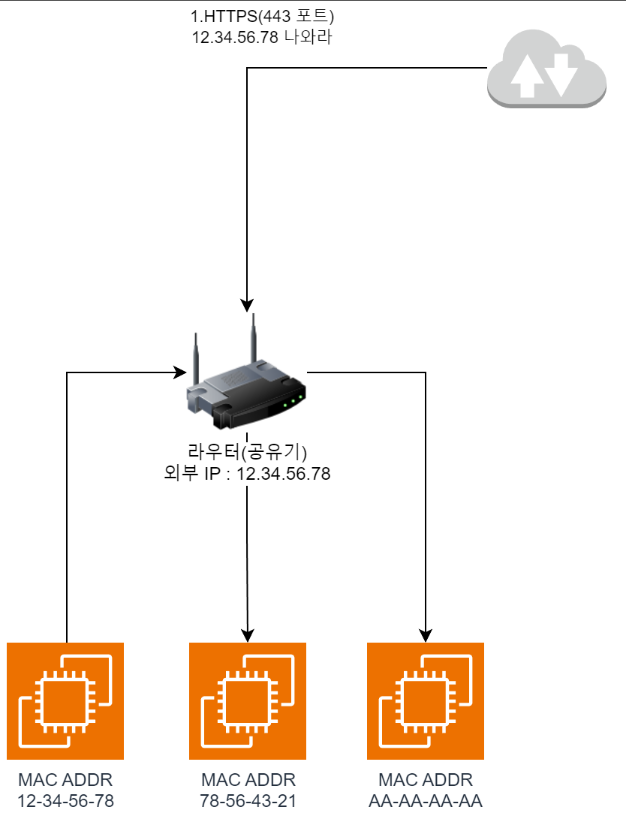
- When you access the server with
https://, port443is requested from the outside.
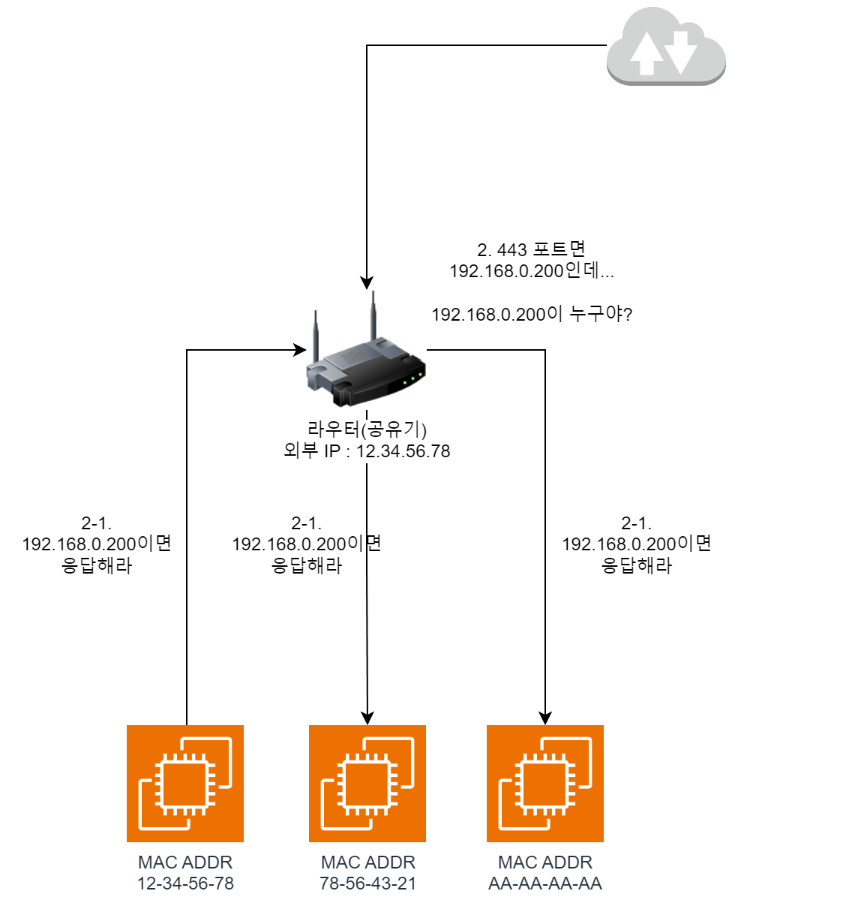
- Due to the
port forwardingsettings we configured above, the router needs to forward traffic to192.168.0.200. But the router doesn’t currently know the192.168.0.200address, so it broadcasts a request askingwhoever has 192.168.0.200, speak upto everyone on the internal network. (ARP Request)
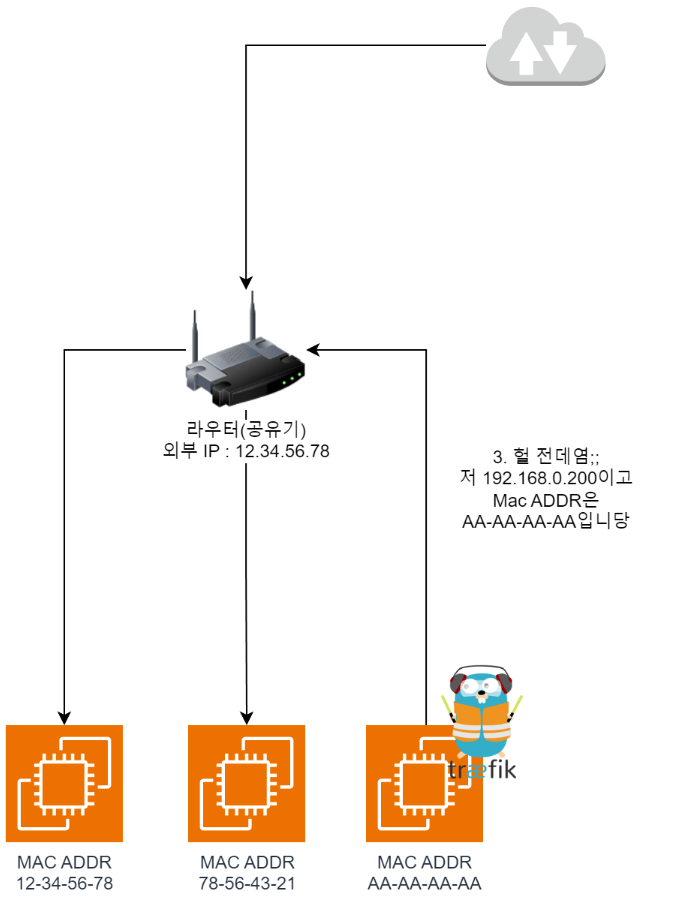
- Then the node where Traefik lives responds with
oh that's me;;and includes itsMAC Addressin the reply. As a result, the router learns that traffic from outside should be sent toAA-AA-AA-AA.
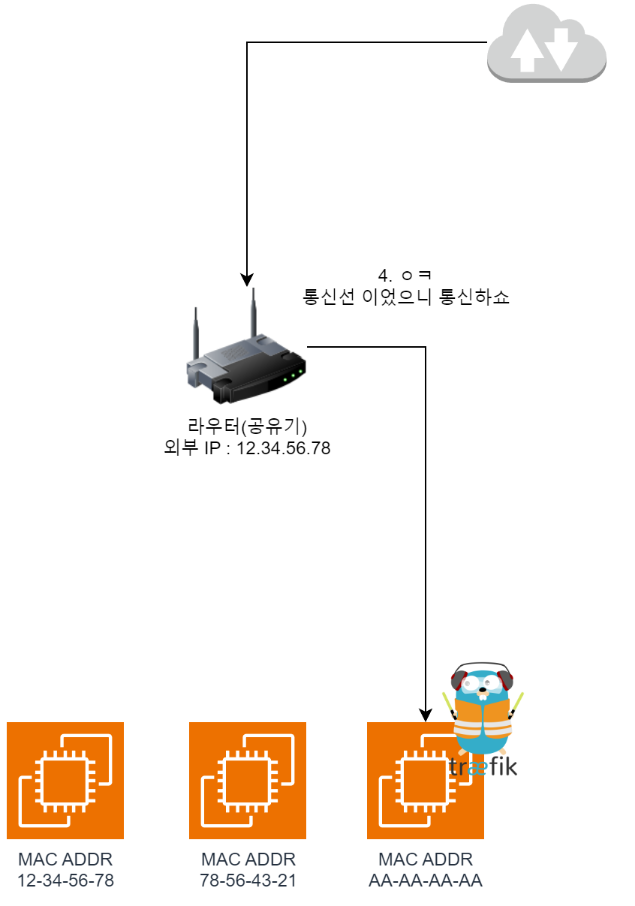
- So now they can pass traffic between each other, and communication is possible.
Confusing Points
Then? Some confusing parts come up. Roughly summarized one by one:
Wait, so can a single node have multiple IPs?
- For example, in the case above, AA-AA-AA-AA would have already been assigned an internal IP by the DHCP server.
- So is it being assigned another additional IP on top of that? Yes, that’s correct!
In MetalLB, a single node can be assigned multiple internal IPs.
What happens if the node where Traefik lives dies?
- Naturally? It briefly goes down and becomes inaccessible.
- However, Traefik will come up on another node, and once a new ARP Request/Response cycle takes place, traffic will be forwarded to the new MAC Address (Node), recovering from the failure.
Who handles the ARP Response?
- The MetalLB container handles the ARP Response and also delivers traffic that comes in for that address to the Pod (Traefik in this case).
Wrapping Up
This content is independent research I did by digging through documentation. (Especially the MetalLB part)
If anything’s wrong, please feel free to correct me, I’d appreciate it!
IpTime is a router brand that’s extremely popular in Korean households. ↩︎
Comments